
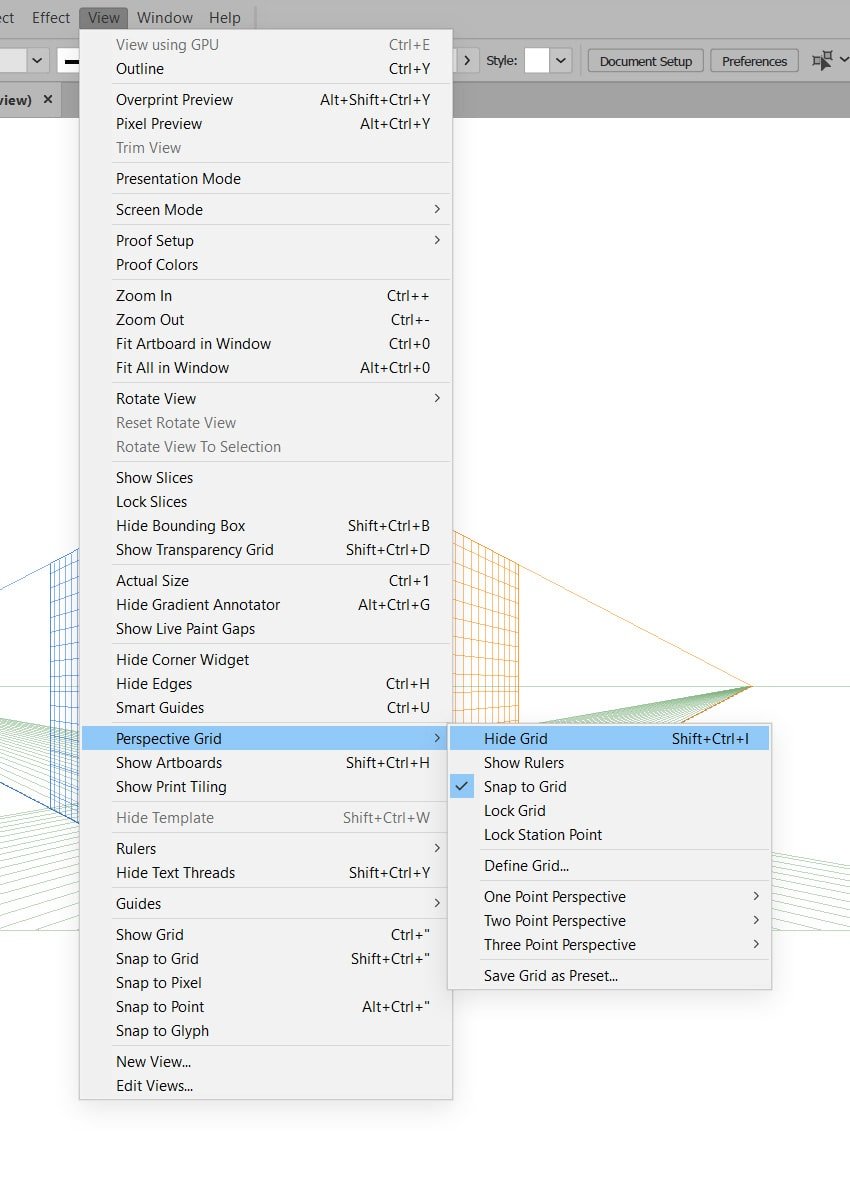
To remove the perspective grid on Illustrator, simply go to the “View” menu, hover over “Perspective Grid,” and click “Hide Grid.” Voila! Your workspace is now free from the distracting grid. Dealing with pesky perspective grids can sometimes hinder your creative flow, but fear not – with this quick solution, you can smoothly navigate your design process without any interruptions. Let’s dive deeper into the steps to eliminate the perspective grid on Illustrator and unleash your creativity effortlessly.

How to Get Rid of Perspective Grid on Illustrator
Welcome to our guide on how to remove the perspective grid in Adobe Illustrator! Dealing with perspective grids can sometimes be tricky, especially if you are new to using this powerful design tool. In this article, we will walk you through the steps to help you easily get rid of the perspective grid in Illustrator and focus on your creativity. So, let’s dive in!
Understanding the Perspective Grid in Illustrator
Before we jump into removing the perspective grid, let’s take a moment to understand what it is and how it works. The perspective grid is a feature in Adobe Illustrator that allows you to create artwork with realistic depth and dimension. It provides a three-dimensional grid system that you can use to align and transform objects within a perspective plane.
While the perspective grid can be a valuable tool for certain projects, it might not always be necessary or desirable for every design. In such cases, knowing how to turn it off can save you time and frustration.
Step-by-Step Guide to Removing the Perspective Grid
Here are the simple steps to help you get rid of the perspective grid in Illustrator:
Step 1: Open Your Illustrator Document
Start by opening the Illustrator document that contains the perspective grid you want to remove. Make sure the grid is visible on your artboard.
Step 2: Disable the Perspective Grid
To disable the perspective grid, go to the “View” menu at the top of the Illustrator window. From the dropdown menu, find the “Perspective Grid” option. Click on it to toggle off the perspective grid display.
Alternatively, you can use the keyboard shortcut “Shift + Command + I” (Mac) or “Shift + Ctrl + I” (Windows) to quickly disable the perspective grid.
Step 3: Confirm the Removal
Once you have disabled the perspective grid, take a look at your artboard to ensure that the grid has been successfully removed. You should now have a flat, two-dimensional workspace without the perspective grid lines.
Tips for Working Without the Perspective Grid
Working without the perspective grid in Illustrator can offer a different creative workflow. Here are some tips to help you navigate your design process without the grid:
Tip 1: Use Guides and Rulers
Guides and rulers can be helpful tools for aligning and positioning objects in Illustrator. You can create custom guides by clicking and dragging from the rulers at the top and side of your artboard. These guides can serve as reference points for precise placement.
Tip 2: Utilize Transform Tools
Illustrator offers a range of transform tools that allow you to rotate, scale, and skew objects with precision. Experiment with these tools to achieve the desired perspective or distortion in your artwork.
Tip 3: Practice Freehand Drawing
If you prefer a more organic approach, try freehand drawing without the constraints of the perspective grid. This method can lead to unique and creative results, allowing you to explore different styles and techniques.
Congratulations! You have successfully learned how to get rid of the perspective grid in Adobe Illustrator. By following the steps outlined in this guide and experimenting with alternative techniques, you can now work more freely and creatively in your design projects.
Remember, the perspective grid is just one of many tools available in Illustrator, and knowing how to toggle it on and off gives you the flexibility to adapt your workflow to suit your needs. Enjoy exploring the endless possibilities that Illustrator has to offer!
We hope this article has been helpful to you. If you have any questions or need further assistance, feel free to reach out. Happy designing!
How To Turn Off The Perspective Grid In Adobe Illustrator
Frequently Asked Questions
How can I remove the perspective grid in Adobe Illustrator?
To remove the perspective grid in Adobe Illustrator, go to the “View” menu, then navigate to “Perspective Grid” and uncheck the “Show Grid” option. This will hide the perspective grid from your workspace.
Is there a shortcut to toggle the perspective grid on and off in Illustrator?
Yes, you can quickly toggle the perspective grid on and off in Adobe Illustrator by pressing Ctrl+Shift+I (Windows) or Cmd+Shift+I (Mac). This shortcut will hide or reveal the perspective grid instantly.
Can I customize the appearance of the perspective grid in Illustrator?
Absolutely! You can customize the appearance of the perspective grid in Adobe Illustrator by going to the “View” menu, selecting “Perspective Grid,” and then choosing “Define Grid.” From there, you can adjust the grid’s color, opacity, and other settings to suit your needs.
How do I reset the perspective grid settings to default in Illustrator?
If you want to reset the perspective grid settings to default in Adobe Illustrator, simply go to the “View” menu, then select “Perspective Grid,” and choose “Reset Grid.” This action will revert the grid settings back to the default configuration.
Final Thoughts
To remove the perspective grid on Illustrator, navigate to the View menu, select Perspective Grid, and then hide the grid. Alternatively, you can use the shortcut Ctrl+Shift+I (Windows) or CMD+Shift+I (Mac) to toggle the perspective grid visibility. Remember, getting rid of the perspective grid on Illustrator is simple and allows you to focus on your design without any distractions. Master this quick process and enhance your workflow effortlessly.